Developing and Managing Tableau CRM Assets in Production
I have come across multiple instances where I have seen companies develop Tableau CRM components directly in production and it is partially because Tableau CRM is almost a point and click tool where you won’t change the business-critical/important configuration of your organization. And I totally understand the allure of doing this. You don’t have to go through the pain of deployment or that of making data available in sandboxes in absence of a full copy/partial copy sandboxes; your solutions are readily available for end users – without much delay, data validation is easier, and you’ll always get a very good picture of how your Tableau CRM components are performing. And if you’re developing a new project altogether, then the ease of rolling it out to end-users increases even more. So far, this development model sounds perfect, right? Is it perfect though? Or is it even the easiest one? Let’s find answers to these two questions.
Note: This blog is part of the Typical Tableau CRM Asset Lifecycle blog series. Read about what it is incl. development stages here. Or check out developing Tableau CRM assets in a sandbox here.
Let’s assume that you’re tasked with creating sales analytics dashboards where your target audience is divided into two categories – managers and sales representatives. The project is called “Sales Analytics”. You have had your requirements for each persona and are now tasked with creating dashboards that would answer day-to-day questions your company’s sales manager or sales representatives may have.
Let us create the following components for the very first release of your project, you’ll find a brief description of each in the table below:
You have tested the above-mentioned components, and have rolled the applications out to pilot users. These pilot users are your super users and have made some recommendations to you in both sales manager and sales representative dashboards. Those requirements have been analyzed and are prioritized to get pushed in Release 2 of the “Sales Analytics” project.
They have made one more request – keep both the dashboards available to them, so that they can continue utilizing the dashboards for their day-to-day business activities.
Here’s where the allure of developing in production starts fading away. You have to modify a couple of components mentioned above but can’t modify them for the fear of breaking them for end users. Hmm…
Don’t worry. I’ll cover a couple tricks and best practices here that will help you with the problem.
Let us take a look at them component by component.
Dashboards
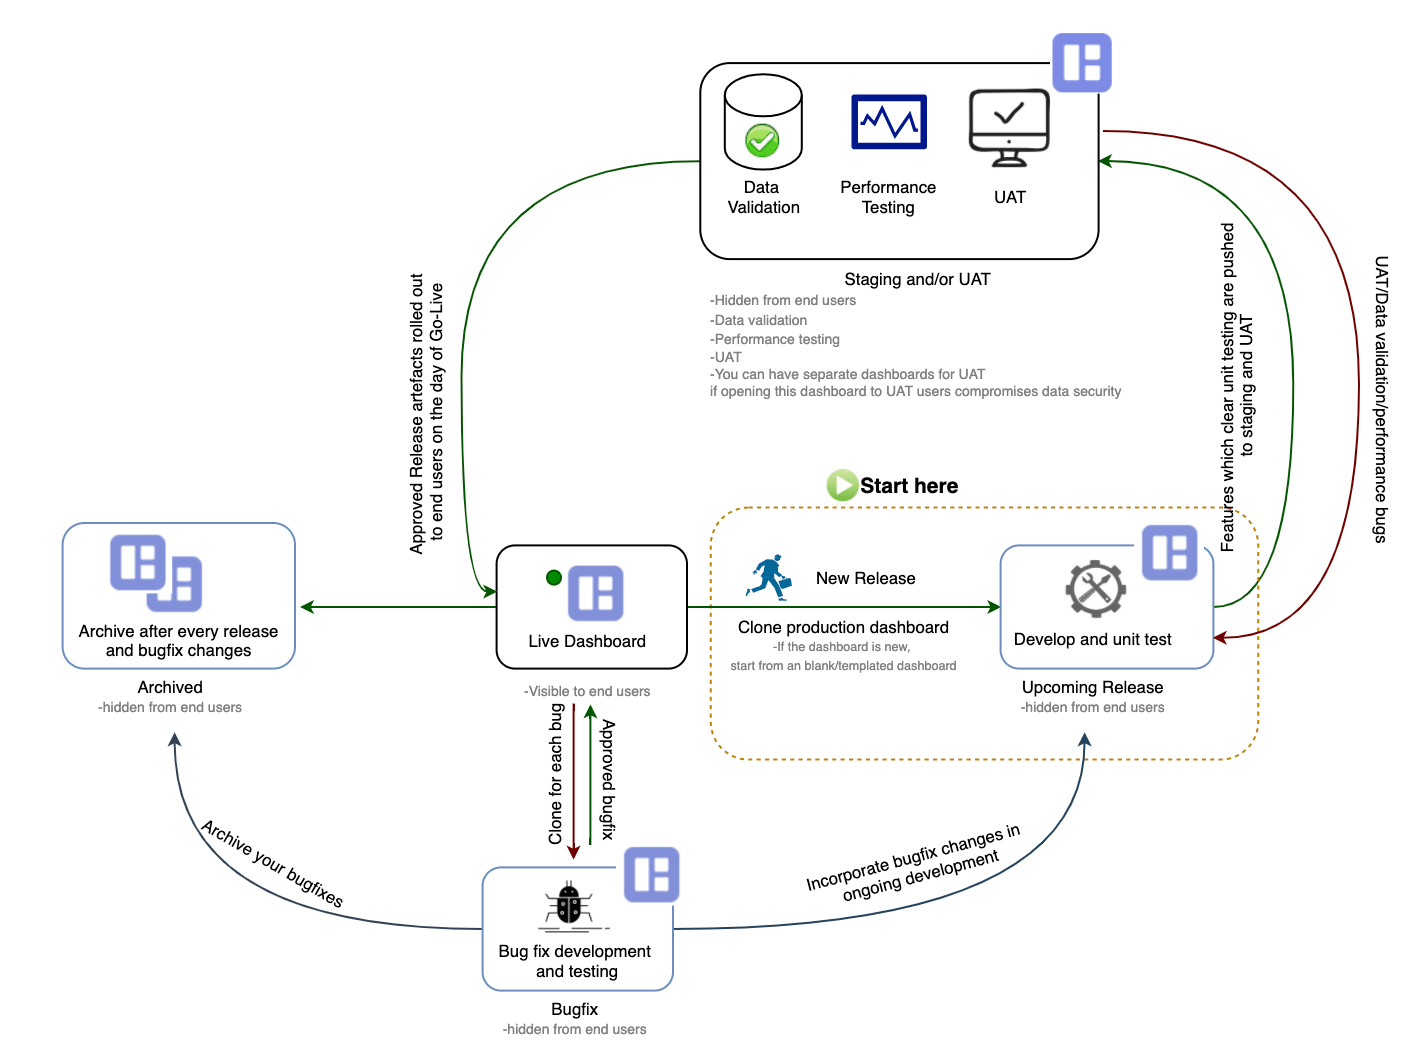
Now that Release 1 of Sales Analytics is live, and you have to modify both the dashboards for Release 2, here’s how you could proceed:
- Create clones of each dashboard: Save one set of clones in an application called “Sales Analytics Archives”. This is the application where you’d be storing stable versions of each dashboard after each release. While saving the dashboard, make sure to follow a naming convention that will help you identify which release this version belongs to. For example: “R1_Jul2020 Sales Analytics – SM”. The second set of clones is where you’d develop your upcoming release, say R2_Jul2020. Follow a naming convention here as well, make sure to include a release here so that it’d be easy for you to identify your changes. Say you named your dashboard “R2_Jul2020 Sales Analytics – SM”. Store these dashboards in an application called “Sales Analytics Upcoming Releases”. You’d want to push your dashboards through testing stages as well – UAT and Staging. So, you have got four versions of your dashboards stored in different applications:
- Archives – this is the stable version of your dashboard(s) of releases that have gone live, which:
- Is hidden from end-users
- Is stored in Archive application: Sales Analytics Archive
- Uses live datasets
- Naming convention = Release DashboardName. E.g.: R1_Jul2020 Sales Analytics – SM
- Actual/Live – this is the live dashboard which is:
- Exposed to end-users
- Uses Live Datasets
- Should not be modified unless there’s an approved change request to do so on the day of Go-Live, or an approved bugfix
- Naming convention = Dashboard Name. E.g.: Sales Analytics – SM
- Upcoming – this is where you’re doing development for the upcoming release. This dashboard:
- Is stored in the Project Upcoming Releases application
- Is not shared with end-users. This is the place where you develop feature by feature (individual requirements) within your release and perform unit testing
- Uses development dataset
- Naming Convention = Upcoming Release Dashboard Name. E.g.: R2_Jul2020 Sales Analytics – SM
- Staging and /or UAT – this is the version of the dashboard where you test your upcoming release changes for:
- Data Validation
- Performance test
- UAT
- Archives – this is the stable version of your dashboard(s) of releases that have gone live, which:
The idea is to detect the data discrepancies, poorly performing queries, and UAT bugs early in the Tableau CRM asset lifecycle.
To keep it fluid, you can push each feature to this dashboard once it passes unit testing. This dashboard is now:
- Visible only to the ones involved in data validation, performance testing, and UAT.
- Stored in Staging/UAT application.
- Uses development dataset.
- Naming convention = Release being tested Dashboard Name. E.g.: R2_Jul2020 Sales Analytics – SM

Now, you can make changes in your dashboard for upcoming releases.
- Versioning within your dashboard: You are all set to make changes for the upcoming releases in your dashboard. But, how do you manage these changes within your dashboard? What if a requirement gets canceled and you have rolled back the changes you made? Or, the changes that you made have introduced serious bugs and you want to revert them but do not recall what all changes you made? This happens more frequently than one would like to believe! I know you do not use version control tools like bitbucket, but don’t worry. Tableau CRM has got you covered. While you were saving your dashboards, you must have observed something called Dashboard Version. Provide meaningful version labels before you save your dashboard. This way, you can always roll back to a previous version if need be. Make sure to follow a naming convention that is accepted and understood by all TCRM developers.
In the image below, this is the naming convention I have followed:
Release<space>RequirementNb<space>BriefOfChangesMade

Versioning doesn’t only help with rolling back to a more stable version, you can use this functionality for your data validation, performance testing and UAT testing features as well.
Say you worked on a requirement Req_201 for R1_Jul2020 release. Now, you have done your unit testing within your Upcoming Release dashboard and are ready for testing in the staging/UAT dashboard. Push the changes made for this requirement to the staging/UAT dashboard and follow the naming convention there as well – Release<space>RequirementNb<space><DataVal/Perf/UAT>
This way you would have a version for each sort of test you’re running and the tester would be able to locate just the right version of the dashboard, test it out and provide feedback.
💡 Tip: Confused about when to clone and when to version? Well, you’d want to clone your dashboards to create multiple copies which cater to different phases in the release. Whereas, you’d want to version your dashboard per the requirement so that you can jump to a previous version of the dashboard, or work on requirements in parallel, or jump to a more stable version of your dashboard. This being said, you can always choose to use one dashboard for development and UAT testing. I do believe that this will lead to increased management overhead, and can lead to a bit of confusion around which version to test, which version to merge, etc.
Note: The role of a publisher is quite critical here, as a publisher manages which version of the dashboard would be visible to all. Salesforce provides you the flexibility to become publisher of a dashboard, however, this isn’t GA yet. You can take a look at this document for more details.
Dashboard Go-Live
You have successfully tested your changes for Release 2 of “Sales Analytics” project. The next step would be to simply copy-paste your dashboard JSON from dashboards “R2_Jul2020 Sales Analytics – SM” and “R2_Jul2020 Sales Analytics – SR”, stored in the “Sales Analytics Staging/UAT” application, on the day of Go-Live. Easy, right?
💡 Tip: When you replace the live dashboard’s JSON with the one which passed UAT/Staging or bugfix test, make sure to modify the name of the dashboard in JSON. You can also change the name while saving the dashboard.
Dashboard Bugfix
And let’s say you have already identified the root cause of the issue, and know exactly what to do to fix the bug, let us focus on how you’ll address bug fixes in the dashboard in production. Create another application called “Sales Analytics BugFixes” where you’ll store dashboards for bug fixes. Create a clone of your live dashboard and save that dashboard in this application. Make sure to follow a proper naming convention again. For example: ReleaseLiveInProd_BugFix <space> DB name, like “R2_Jul2020_BugFix Sales Analytics – SM”. Here also, make sure to version each change, follow the naming convention. For example: ReleaseLiveInProd<space>RequirementNb<space>BriefOfChangesMade-“R2_Jul2020 BugFix_101 FormulaChange”
Make your changes in the dashboard, test your changes, get the bugfix approved by stakeholders, and then push this change to your live dashboard, “Sales Analytics – SM”.
Now, make sure to incorporate these changes to your ongoing release development as well, or you’ll overwrite changes made for bug fix by your upcoming release. Also, push this dashboard then to the archived folder.
💡 Tip: When you clone a dashboard, the conditional formatting also gets cloned. But when you copy-paste the JSON of a dashboard, the conditional formatting doesn’t automatically get carried along. You’d have to make those changes manually if any.
To summarise, once you’ve got releases rolling for your dashboards, you’d have five versions of each dashboard shown as below:
Datasets
This is where the magic happens. With multiple clones of dashboards in place, one may ask the obvious question of do we need multiple datasets to power those dashboards. And the answer is “Yes”. But not always. Let us see what I mean here by taking a look at the diagram below.

Here, we’re talking about 3 different datasets. Let us see why do we need them and where would we use them. We will also take a look at what the naming convention could be.
- Live Dataset – this is your actual dataset which:
- Is exposed to end-users
- Is used in live dashboards, lenses
- Is stored in an application accessible to end-users
- Has the necessary security layer in place – security predicates/ sharing inheritance + security predicates or security predicates
- Should not be modified unless there’s an approved change request to do so on the day of Go-Live, or an approved bugfix
- Naming convention = DatasetName. E.g.: OppsWithOppLines
- Development Dataset – you’d create this dataset only when you’ve dataset-related changes in your upcoming release, or when you need to test security on the scale. When you do not need this dataset, you’ll use the live dataset to power your upcoming release and UAT/Staging dashboard. This dataset:
- Is hidden from end-users
- Is used in the upcoming release, UAT/Staging dashboards, lenses
- Is stored in UAT/Staging application
- Is visible to developers of the dashboard, the ones performing data validation, performance test, UAT users and security test users
- This is where you’ll use test users to test out your security before rolling it into the live dataset
- Naming Convention = Dev_DatasetName. E.g.: Dev_OppsWithOppLines
- BugFix Dataset – you’d create this dataset when your bugfix requires dataset changes, and/or security changes. Its recommended to not push such changes in bug fixes, unless absolutely necessary. When you do not need this dataset, you’ll use the live dataset to power your bugfix dashboard. This dataset:
- Is hidden from end-users
- Is used in Bugfix dashboards, lenses
- Is stored in the Bugfix application
- This is where you’ll use test users to test out your security, or addition/modification of a column for bugfix before rolling it into the live dataset
- Is visible to developers of the bugfix dashboard and approval board
- Naming Convention = Release_BugFix_DatasetName. E.g.: R2_Jul2020_BugFix_OppsWithOppLines
Now that we know scenarios of dataset creation, lets deep dive into how to create datasets in production, and how to manage the dataflows, recipes etc
In Tableau CRM, you can create your datasets in four ways:

- CSV Uploads: CSV upload creates a dataset in your Tableau CRM instance. Let’s say this CSV of yours has got pricing data of some of your products, and you’re using this confidential dataset in the “Sales Analytics – SM” dashboard. In release 1 of the “Sales Analytics” project, you created this dataset. Now in Release 2, you want to remove a column from this dataset. But you’re using this column in the current dashboard which is available to end-users, and plan to remove its reference in Release 2. This basically means you can’t simply update the data in the live dataset, or your users will encounter query errors. So, what could you do here? The answer is simple. You would have to create another dataset, use this dataset for your upcoming release, and then on the day of go-live, update data of actual data. Remember to follow the naming convention mentioned beforehand.
- Dataflows: This is where it starts getting tricky. As of today, only 100 dataflows (with sync enabled) can be created in TCRM. So you’d create your dataflows on a need basis. Here’s how:
You’d have three sets of dataflows:
- Actual/Live dataflow (Opps with Opp Lines in case of Sales Analytics) – This is the dataflow which will create final datasets for your project, this is the one you’ll schedule as per your requirement
- Develop/Test dataflow – You’ll create this dataflow only when there are dataset changes in the upcoming release. Use a good naming convention like Dev_dataflowname, e.g.: “Dev_Opps with Opp Lines”. Dataflows also support versioning in Tableau CRM. So try to make changes per requirement and provide the proper version name to your dataflow. This is the naming convention you can use: Release<space>RequirementNb<space>BriefOfChangesMade. Do not forget to change the name of datasets in your register node.
- It is advisable to have several scratch dataflows that allow you to isolate and test out units of work, such as complex compute expressions, etc. You may do this for scale reasons as well to ensure the flow executes in under two minutes and not take up resources/limits.
- Another point is with the develop/test dataflow you may wish to work only on a subset of data with judicious use of filter nodes so the entire flow is executed on time. Remembering that you may want full-scale datasets for dashboard builds and effective performant queries, be careful on registering over existing dev datasets.
Note: TCRM supports versioning of Dataflows as well. When you’re updating your dataflow, a prompt would ask you to provide a label to the “version history”. This is where your naming convention will come into the picture. Follow the one which you have been using for your dashboards, like “R1_Jul2020 Req_115 Add user object”. This way, it will get easy for you to revert the changes you made if needed.
💡 Tip: Although you have the option to store versions of dataflows, try to store JSON files of dataflows in your local after each release/bugfix (if dataflow changes) goes live.
Once you have made and tested your changes, you can merge it back to actual dataflow on the day of Go-Live, and change the name and label back to the original. And you’re good to go.
- Bugfix Dataflow– What if there’s a bug fix on dataflow? Honestly, I’d say try to avoid pushing bug fixes on dataflows as much as possible. But if you cannot get out of it, then this is what you could do:
- Download the JSON of your live dataflow
- Create a new dataflow for bug fix specifically, use this naming convention: BugFix_DF name, like “BugFix_Opps with Opp Lines”.
- Upload the JSON downloaded in step 1 – By doing these 3 steps, you’ve created a clone of your dataflow
- Change the name and labels of datasets in the register node – Do not forget this step or you’ll overwrite your live datasets with the ones containing bugfix datasets
- Make your changes, update with proper version history label – this is the naming convention you could use – Release<space>BugfixNb<space>BriefOfChangesMade
- Get the changes tested thoroughly
- Get your bugfix approved
- The day bug fix has to be pushed to production:
- take a backup of live dataflow
- upload your bugfix dataflow into the live dataflow
- Rename the dataset names and labels with correct names and labels(the ones which your live datasets are using, like “OppsWithOppLines”
This is what the final picture would look like:

- Recipes: You can follow the same steps in recipe development management as for dataflow. But of course, there are a couple of differences
- You can clone a recipe by using ‘Save As New…’ functionality; you can also download recipe 3.0’s JSON and upload it to create a clone
- Renaming the dataset in the “Run Recipe” window creates a new dataset in the Classic recipe
- Renaming the dataset’s API name in the output node creates a new dataset in recipe 3.0
💡 Tip: In the case of both dataflows and recipes, you’ll create at least 3 copies of each to address bug fixes and manage the upcoming releases. In this process, I have advised you to change the dataset name and label of the dataset you’re registering. Please make sure to use these datasets in your bugfix and upcoming release dashboards, and when you’re replacing the live dashboard with the bugfix/upcoming release dashboard, make sure to use the names, labels, and ids of live datasets. Even after all the testings, and checks in place, something can still go wrong. Don’t worry about it though. You can always revert to a previous version of the dataset in the Edit Dataset window.
Below is what the overall dataflow/recipe management would look like in production.

Cleanup
If you follow the steps mentioned above, you’re bound to create metadata files that will stop being relevant after a while. Please make sure that you do metadata cleanup frequently to avoid clutter and not hit limits.
To sum up…
I have tried to cover as many tricks and best practices as I could to creating and maintaining Tableau CRM assets directly in production. In my personal opinion and experience, as the size of the team grows, the scale of the projects increase, dataflows and recipes take longer to transform your data, you may find yourself at a disadvantage with respect to Tableau CRM resources available in production. The dev dataflows, dev recipes may delay the run of live dataflows or recipes or vice versa. Or even after having several checks in place, someone could overwrite the live dashboard with an unapproved version of the dashboard. Or you could be nearing the data row count limit of org. Instead of making life easier, this approach may no longer suit your needs and you may find yourself in a situation that is more complex and difficult to manage. And I think this is where you may want to consider developing in a sandbox.
Again the questions around how to develop and how to migrate might linger. Don’t worry, I’ll answer them in the next part of this blog series.