Flag to clean with Salesforce Data Pipelines
Are you a Salesforce admin or Salesforce owner and get requests that “those contacts are not clean”? There are probably duplicates, information that hasn’t been completed, or maybe you haven’t actually touched or worked with this contact in more than a year. If you use this data for your marketing campaigns then it becomes important that your data is up to date.
I at least know one that is facing this issue and my reply was: if we know what to look for then we can use a recipe to find contacts that match our criteria, flag them in Salesforce, list views can then be set up so contact owners know what contacts to review or update. If you are afraid account owners won’t remember to do this – well, the power of the Salesforce platform allows you to set up flows to kindly remind them. And with filtered list views, it’s not only easy to get an overview of the contacts you need to review, but you can also use inline editing and avoid clicking back and forth.
Now you are probably wondering how you use Salesforce Data Pipelines (or CRM Analytics) to do this. I already wrote a blog with some use case examples including how to set it up that I recommend you check out. So in this blog, we will take a different approach, I’ll focus on a few transformations you can include in that contact clean-up. Now each Salesforce implementation is different and the type of information you require is also different, so it will be impossible for me to address all use cases, but I hope this blog will give you some considerations and formulas you can adapt to what you are looking to achieve.
Note: In this example, I will be referring to Salesforce Data Pipelines, but if you have CRM Analytics, then you can also enjoy the power of our data tools and this use case is still possible.
The end result of the recipe will look like the image below.

Input data
In my example, I will be starting with a new recipe, but note that if you already have started creating recipes, you should consider if you are better off extending an existing recipe – especially if the different use cases are like peanut butter and jelly. However, if it’s more like peanut butter and mayonnaise you should probably keep them in different recipes.
Anyway, I’ll first be adding my input node referencing the contact object. What you need to bring in depends on what you want to check and do in your recipe. So it’s good to have a plan from the beginning. Here I’ve just brought in the Contact ID, Account ID, Last Name, First Name, Phone, and Email.

Transformations
Now I am assuming that you have created or at least know how to create a field in Salesforce where we can flag that “something is up”. It may even be that you have multiple flags for different scenarios, that’s really up to you to decide, all I’ll say is just have a proper reason for all the fields you create else you just create a different mess you need to clean up later (too).
In my solution, I have created two fields on the Contact object in Salesforce; a simple boolean/checkbox for a flag (hey check out this record) and a description field where I can give a bit more context as to why this record is flagged, that way the contact owner knows how to improve the contact – or if it should simply be deleted or merged with another contact. You decide if this too makes sense for you or if you need different fields for the automations you may want to trigger as a result. Regardless make sure they have been created before you attempt to create your output node and run the recipe.
Note: For more information on custom formulas and the functions available head to Salesforce Help.
Flag to be cleaned criteria
After my input node, I’ve created a transform node to look for different criteria to flag – this node contains three formulas that check the following:
- If the last name contains the specific value Unknown
- If email and/or phone are missing
- If the email is a duplicate compared to other contacts related to the same account.
Let’s look at each of them in more detail below.
If the last name contains the specific value Unknown
For this criteria, I’ve created a new custom formula via the fx button and used a case statement to check if Last Name equals Unknown – if it is the formula returns ✅ if not a dash is returned.
case
when "LastName" = 'Unknown'
then '✅'
else '-'
end
The output is text and I’ve called the new field LastName_Check.
If email and/or phone are missing
This is another formula I created which is a bit more advanced than the latter example. Here we’re checking for three things:
- Email and phone are null
- Email is null but phone is not
- Phone is null but email is not.
This results in three where statements as seen below. The output is similar to the example above but I’ve added a bit more description as we are checking for more things and I want to make sure the contact owner knows exactly what to update.
case
when "Phone" is null AND "Email" is null
then '✅ No email and phone'
when "Phone" is not null AND "Email" is null
then '✅ No email'
when "Email" is not null AND "Phone" is null
then '✅ No phone'
else '-'
end
The output is text and I’ve called the new field EmailPhone_Check.
If the email is a duplicate compared to other contacts related to the same account
The last flag check I created is another formula, but in order to check for duplicates we are going to leverage a multiple row formula, so make sure to toggle that box after clicking the custom formula button. If you are familiar with dataflows this is similar to a computeRelative using information from multiple rows whereas a regular formula just looks at information from a single row.
Before we add the case statement, let’s make sure we partition or group by Account ID since we are interested in looking for duplicate emails from within the same account. We will then sort by email, to get the duplicates after each other. Sort direction is not important for this example as we will be looking at rows before and after, so I’ve left it at ascending.
The case statement is somewhat simple, but because we are calculating across rows we have different windowing functions to leverage. Here we are comparing the email value from the current row to the next (lead) row and from the current row to the previous (lag) row. If either is true, which is why we use OR, then the output is ✅ as with the previous examples.
case
when current(Email) = lag(Email) OR current(Email) = lead(Email)
then '✅'
else '-'
end
The output is text and I’ve called the new field EmailDup_Check.
Below you see the three formulas and their output we just created in the transform node.
Flag records
The next step is to set the flag if this record needs attention and what needs to be done. This is the information we want to later write back to the Contact object. To keep it easy to see what’s going on in the recipe I’ve created a new transform node just after the one we just created. In this node we will do two things:
- Join together all the descriptions provided in the previous three formulas in one field.
- Create the flag that will be used for the checkbox on the contact record
Create the description field
To join the output from the three formulas we will create a new custom formula and use the concat() function to concatenate the different values. However, let’s make it a bit more explicit and have a description before each ✅, as illustrated in the picture below, which is an example of the end result in Salesforce.
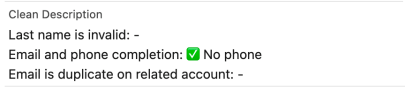
With the concat() function I just define each string and separate them with a comma; first, a string on what we are checking for followed by the result from the formula. To get the different values on different lines I’ve included \n where I want a new line to occur.
concat('Last name is invalid: ', "LastName_Check", '\nEmail and phone completion: ', "EmailPhone_Check", '\nEmail is duplicate on related account: ', "EmailDup_Check")The output is text and I’ve called the new field CleanDescription__c.
Create the checkbox
It’s time for the last case statement, which will help us set the flag to true or false depending on if one of the checkpoints demands attention from the contact owner. Since we just created the description field which will include a ✅ if the record needs any attention, we can just look for that in the string. So if the description contains ✅ then return true else return false.
case
when contains(CleanDescription__c, '✅')
then 'true'
else 'false'
end
The output is text and I’ve called the new field CleanFlag__c.
Below you can see the two new formulas and a preview of the output from the second transform node.
Drop and write data back to Salesforce
As we are only going to push two of these newly calculated fields back to the contact object, I like to drop the fields we do not need to make the process of writing back faster and most importantly not overwrite something we shouldn’t by mistake. Therefore I’ve created a new transform node to drop all fields except:
- Contact ID
- CleanDescription__c
- CleanFlag__c
You can select multiple columns by holding down the command key and you will get the drop option in the menu. Or you can just choose the drop quick transform and select the fields from there.
Note: if you want you can keep all the transformations in one transform node – as long as the sequence of them is the same as this blog. Here I’ve separated them to give a better overview. And no it shouldn’t have a performance impact.
Finally, it’s time to create the output node as the last step and choose to write back to Salesforce. Simply select your output connector and map the columns – if you named your new columns according to the field names in Salesforce the mapping will happen automatically. And don’t forget to choose the UPDATE operation.

And that’s it. You can now run your recipe, grab a coffee and sit back and let Salesforce Data Pipelines do its magic. You can, of course, also schedule this to run when you need it, but regardless remember to make sure your input connector has run first.
Note: For more information on how to enable the output connector and the output node head over to Salesforce Help for a step by step guidance.
Salesforce, take it away…
If you have already worked with recipes and read this blog you may think “wait, couldn’t you do this instead?”. Sure, there are always multiple roads you can travel. I’ve structured the recipe and solution this way to make it simple to read, maintain and replicate in different scenarios.
But once you have your recipe created, tested, and of course, scheduled to run, then you can continue to leverage the core platform tools to automate messages, tasks, create list views, scheduled jobs, flows, triggers, or something completely different to act on your new data enhancements.
Great insights on streamlining Salesforce data cleanup! The use of flags and Salesforce Data Pipelines is a game-changer for efficient contact management. Thanks for sharing this valuable solution!